|
Previous Page
Of Tour
|
Diagrams & Work
My Enviro-Fountain
(Page 6 of 10)
|
Next
Page
Of Tour
|
|
This Garden Tour has been Provided exclusively for the AVS by Gary W. Sherwin
|
|
|
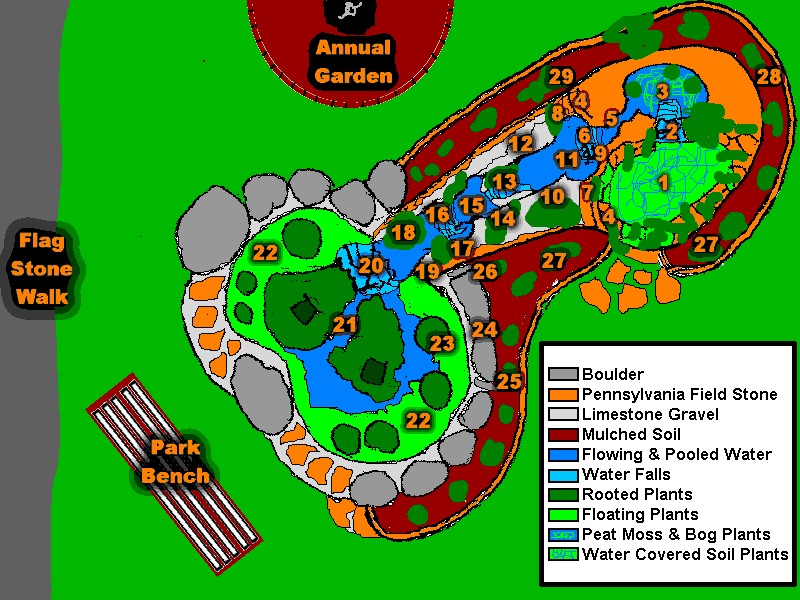
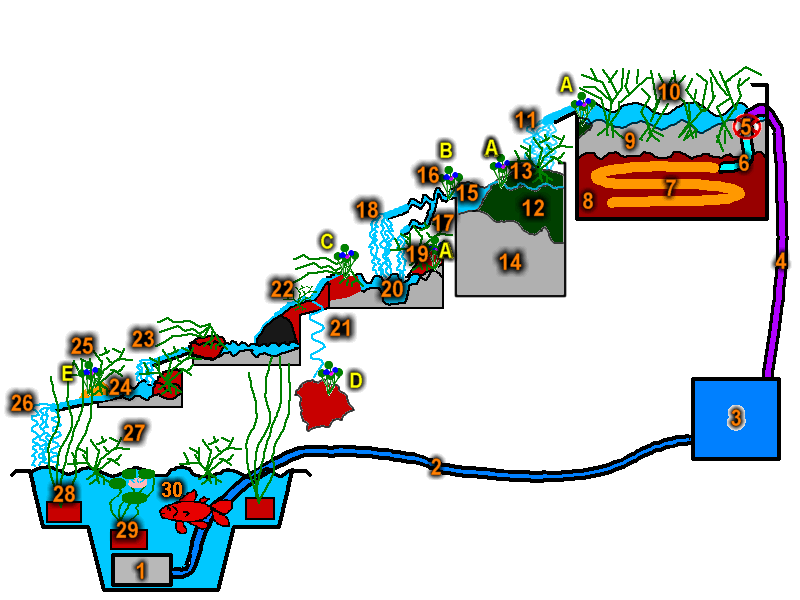
The diagrams below, present the Enviro-fountain in
layout and schematic views. The layout view
shows the location of the nearly 30 unique
micro-habitats supported by the fountain. This diversity
of habitat, allows for a diverse collection of plants
to be naturalized into the system. Every
location around
the fountain is accessible without stepping into the
confines of its borders. Use of stone for the
primary structure
makes this possible, by permitting a relatively tall
and narrow self supporting structure. I have to
confess that the stone facing of the upper structure,
was Cindy's idea. I was just going to mound dirt
to form the necessary rise, but that would have
required a much larger, less controllable and
accessible design. It is likely, that a wider
spread design would not have been as successful at
accomplishing my goal of micro-encapsulation of a group of water
related communities.
|
Enviro Fountain Layout
|
1. Watercress Spring
2. Sparkling Water Fall
3. Peat Bog Spring
4. Dry Stone Cliff
5. Rock Crevice Stream
6. Splashing Water Fall
7. Seepage Cliff
8. Damp Cliff
9. Water Shaded Rocks
10. Wet Mountain Streamside
11. Mountain Trickle Pool
12. Damp Mountain Streamside.
13. Shallow Rock Chute
14. Saturated Ground
15. Swirling Pool
16. Shimmering Water Fall
17. Flowing Water Soil
18. Mossy Stream Rocks
19. Still Water Soil
20. Ribbon Water Fall
21. Fish Pond
22. Shallow Water
23. Marsh Habitat
24. Boulder Pile
25. Marsh Shade
26. Leakage Area
27. Afternoon Shade E
28. Noon Shade N
29. Morning Shade W
|

|
|
|
|
|
The fountain was built,
starting with a prefab 150 Gallon Water Garden Pond
and 2 X 4 Wire Fencing Cloth. I used the wire
cloth to form a
connected series of cylinders of increasing height as
a sort of sculptors armature to support the envisioned
structure. The ends of the fence sections were
joined, by bending and wrapping the
cut ends of the horizontal wires around the adjacent
cylinder's vertical wires (except for the tallest one,
which connected to itself). The dirt removed
from the hole for the pond, was used, to fill all but
the tallest cylinder with soil. Once the hole
was completed, Fence Fabric "circles" were cut
to fit and attached at dirt-fill level in each of the
cylinders to form the floor for that level's
waterway. The top, hollow level, also had such a
floor attached, about a foot below its top edge.
The interior of the lower portion of the tallest
cylinder was left empty to house the water pump and
Low Voltage Lighting Transformer / Timer. The
top edge of each cylinder was bent down, adjacent to
the next lower cylinder to form the brink for that
level's waterfall. The lip of the final
(smallest) cylinder was extended with a crescent of
fence fabric to form a long spillway, hanging out over
the pond.Once the armature was completed, heavy duty,
flexible pond liner was cut to shape (With very large
overlap), fitted into the top of each cylinder and
attached with screws into small rectangular blocks of
pressure treated wood, (inserted behind the fence
fabric and then turned to catch on the wires and pull
the liner apron against the fabric). Once the
liner was in place, the plumbing was installed.
A garden hose was used to fill the top level, and
subsequently the lower levels and pond with
water. Assorted rocks and gravel were used to
line the waterway and to extend or modify the brink of
each water fall. I also got ahead of myself, and
placed soil and planted a few plants along the
waterway. That proved foolhardy, as when I
proceeded to turn on the pump, its flow was so
large that it washed everything down into the pond,
the result of a miscalculation generated "Flash
Flood". A pinch clamp flow valve solved
this problem and the fountain was let run, so as to
disperse the chlorine and other chemicals in the tap
water that it had been filled with. It took a
little fiddling with the flow rate, to find a setting
that would compromise between the desire for splashing
water and the desire not to loose too much water to
quickly to the splashing and also to evaporation. |
| First Stage Bio Filter |
| 1. Intake Filter |
2. Intake Line
3. Pump
4. High Pressure Supply
5. Pinch Valve
6. Low Pressure Supply
| Second Stage Bio Filter |
7. Diffusing Manifold
8. Ceramic Gravel
9. Limestone Roots & Mud
10. Submerged Soil Plants
|
| First Stage Aeration |
| 11. Sparkling Waterfall |
| Third Stage Bio Filter |
12. Peat Moss (Live)
13. Moss Rooted Plants
14. Limestone Gravel
15. Up-well / Spring
|
16. Rock Crevice Stream
17. Cliff Seepage Leak
| Second Stage Aeration |
18. Splashing Waterfall
19. Water Filtered Light
20. Pool
|
| Desalination |
| 21. Intentional Leak |
22.
Shallow Rock Chute
| Third Stage Aeration |
| 23. Shimmering Waterfalls |
24. Low Slope Channel
25. Mossy Stream Rock
| Fourth Stage Aeration |
| 26. Ribbon Waterfalls |
| Fourth Stage Bio Filter |
27. Floating Plants
28. Cattails & Sedges
29. Hardy Water lilies
30. Goldfish
|
|
|
The next day, I started
populating the project with
plants. I found a place
where a small "Puddle
Wetland" had developed
along a nearby road, as a
result of a blocked drainage
ditch. I knew that the
road crews would be correcting
the "problem" within
a month, so I
"rescued" an
assortment of sedges and reeds
from their certain
demise. As it turned
out, two days latter, they
mowed the area and destroyed
what was left of the
"weeds" along the
road. |
|
Enviro Fountain
Schematic
|
|

|
| Violets In The System |
A. Viola cuculatta
B. Viola species (possibly V. renifolia)
C. Viola fimbriatula
D. Viola sororia
E. Viola species (possibly V. mackloskyi)
|
|
|
|
|
Starting the fountain flow, before the facing stone
arrived, allowed for relatively easy adjustment of the
shape of the wire armature and resulting falls, pool and
run forms. Once again, I have to confess, that this
was not the result of my "plan" but due to the
fact that we had a delay in the delivery of the 1-1/2 tons
of field stone, needed to face the fountain. Once we
were satisfied with the functionality and form of the
fountain and pond, we added our first goldfish to
the pond. We lost a few of them initially to either
a raccoon or the neighbor's cat. We suspect the
later since we saw it at the pond edge with paws in the
water several times, but it could have been the coon or
both. The addition of boulders, purchased
aquatic plants and creative arrangement of the marsh
plants, eliminated the predator problem by limiting the
area available for the animal to stalk, and by providing
adequate cover for the fish. We ran our fountain for
nearly a month, before the stone arrived. It took
another month of evenings and week ends to do the masonry
work, but the results were worth the wait. Uncle
Chuck would be proud. (He taught me how to lay and
face stone.)
|
© Gary W. Sherwin American Violet Society 2000
|
|
Previous Page
Of Tour
|
|
Next
Page
Of Tour
|
|
|

